
There is a gap between the coffee you drink at a great café and what most people make in their kitchen. Learning to brew specialty coffee at home closes that gap. Not with expensive machines, but with attention to a handful of variables that most guides gloss over. Grind size, water temperature, brew ratio, and technique are the real levers. Get those right, and your morning cup stops being routine. It becomes a ritual worth savoring. This guide walks you through exactly how to do that, step by step.
Table of Contents
- Key takeaways
- How to brew specialty coffee at home: the right setup
- The pour-over method, step by step
- The French press method, step by step
- Refining your technique for consistent results
- My honest take after years of home brewing
- Elevate your ritual with Maisoncantin
- FAQ
Key takeaways
| Point | Details |
|---|---|
| Grind quality first | A burr grinder improves cup clarity more than any other single equipment upgrade. |
| Control your ratio | Use a 1:16 coffee-to-water ratio and a digital scale for repeatable, consistent results. |
| Temperature matters | Brew at 200°F for medium roasts; let boiling water rest 45 seconds if you have no thermometer. |
| Bloom before you pour | A 30 to 45 second bloom releases CO₂ and prevents uneven extraction in pour-over brewing. |
| Taste and adjust | Use brew time and flavor cues together to refine your grind size until the cup is balanced. |
How to brew specialty coffee at home: the right setup
Before technique comes preparation. The term “specialty coffee” has a specific meaning in the industry: it refers to beans that score 80 points or above on the Specialty Coffee Association’s 100-point scale. These are high-quality, traceable, single-origin or carefully blended beans. Starting with beans of that caliber is non-negotiable. Everything else you do is just protecting the quality already locked inside them.
Beans and grinder
Buy whole beans, not pre-ground. Whole beans in airtight containers dramatically outperform pre-ground coffee in flavor longevity and aroma. Once ground, coffee loses its best qualities within 20 to 30 minutes.
For grinding, a burr grinder is the single most impactful tool you can own. Grind quality controls extraction more than machine choice, and burr grinders in the $30 to $150 range produce particle sizes consistent enough to transform your cup. Blade grinders chop unevenly, which means some particles over-extract while others under-extract. The result is a muddled, unbalanced flavor. A burr grinder eliminates that problem.

Water and temperature
Water quality shapes flavor clarity. Use filtered water if your tap water tastes off. For temperature, 195°F to 205°F is the proper range, with 200°F being the sweet spot for medium roasts. If you do not have a thermometer, bring water to a boil and let it rest for 45 seconds. That brings it close enough.
Equipment comparison by setup level
| Setup level | Grinder | Kettle | Brewer | Scale |
|---|---|---|---|---|
| Starter | Hand burr grinder | Standard kettle with thermometer | French press | Optional but recommended |
| Mid-range | Entry electric burr grinder | Stovetop gooseneck with thermometer | Pour-over dripper | Digital kitchen scale |
| Enthusiast | Quality electric burr grinder | Variable temp electric gooseneck | Pour-over plus French press | Precision digital scale |
A few other items belong in every setup:
- A pour-over dripper or French press (covered in detail below)
- Paper filters for pour-over methods
- A digital scale for measuring dose and brew water
Pro Tip: Gooseneck kettles give you precise, even flow control over your grounds. Variable temperature electric models are the gold standard. If you use a stovetop version, pair it with a clip-on thermometer.
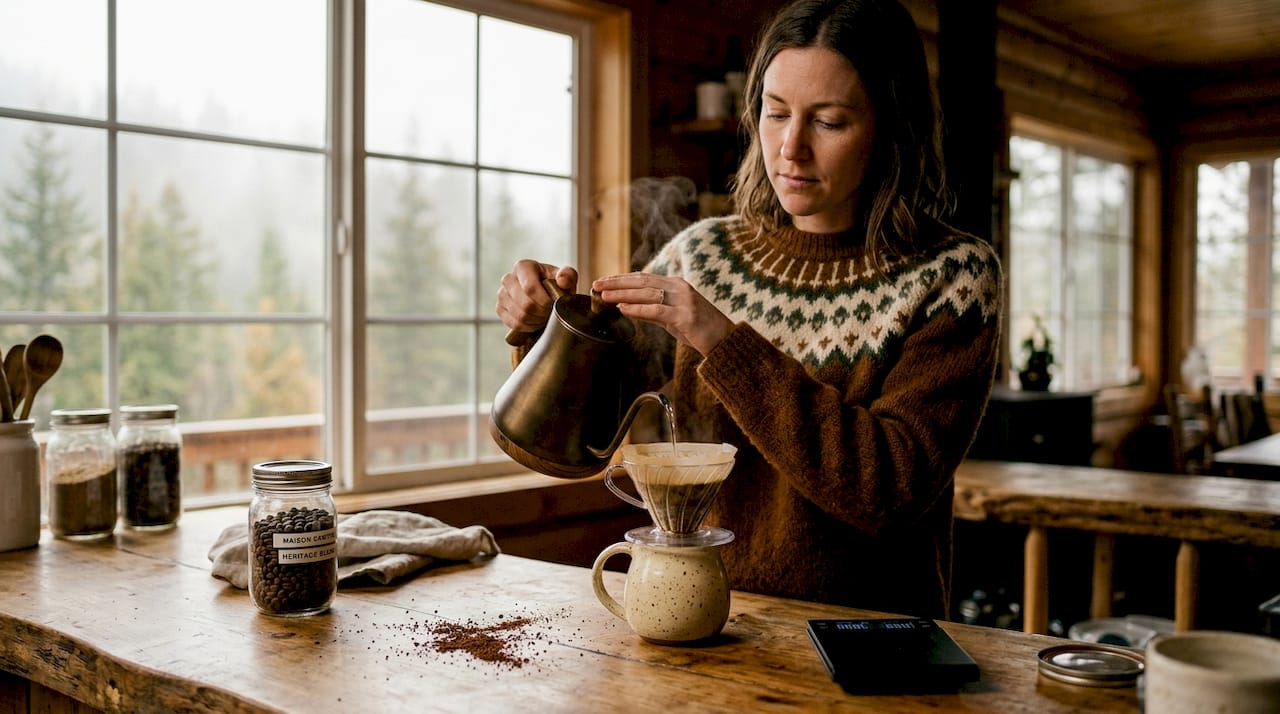
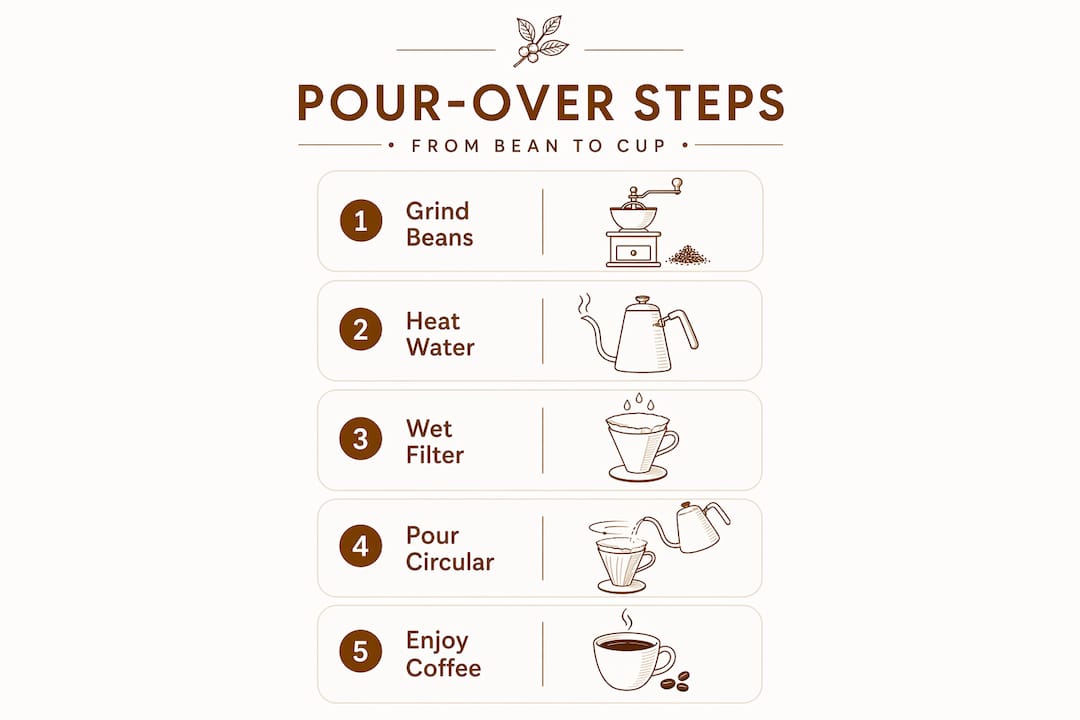
The pour-over method, step by step
Pour-over is the best method for experiencing the full flavor range of a specialty bean. Paper filters produce a cleaner, brighter cup with more clarity than metal mesh filters. If you want to taste the floral, fruity, or tea-like notes in a light or medium roast, this is your method.
The recipe
Use 20 g of coffee to 320 g of water at 200°F. That is a 1:16 ratio. Grind to a medium-fine texture, roughly the consistency of table salt.
- Rinse your filter. Place it in the dripper and pour hot water through it. This removes paper taste and preheats your vessel. Discard the rinse water.
- Add your ground coffee. Give the dripper a gentle shake to level the bed.
- Start the bloom. Pour 40 to 60 g of water (two to three times the coffee weight) slowly and evenly over the grounds. Start your timer.
- Wait 30 to 45 seconds. You will see the grounds dome and bubble. That is CO₂ escaping. Blooming releases CO₂ and creates even saturation across the coffee bed, which is what makes extraction consistent.
- Pour in slow spirals. Starting from the center and moving outward, pour in steady, controlled circles. Aim to finish all 320 g of water by the 1:45 to 2:00 minute mark.
- Let it draw down. The total brew time, from first pour to last drip, should fall between 2:30 and 3:30 minutes.
- Taste and note. Before adjusting anything, taste the cup.
Dialing in your grind
| Brew time result | Flavor signal | Adjustment |
|---|---|---|
| Under 2:30 minutes | Sour, thin, underdeveloped | Grind finer |
| 2:30 to 3:30 minutes | Balanced, sweet, clear | No change needed |
| Over 3:30 minutes | Bitter, heavy, harsh | Grind coarser |
Use brew time as your feedback signal. Change only the grind size while keeping everything else fixed. That isolation is what makes the dial-in process reliable.
Pro Tip: When you change coffee origins or roast levels, treat it as a new dial-in. Each bean behaves differently. Start at medium-fine and adjust from there.
The French press method, step by step
Where pour-over highlights clarity and brightness, the French press delivers body and richness. The metal mesh filter lets oils and fine particles pass through, which creates a heavier, more textured cup. For fans of dark, chocolatey, or nutty roasts, this method is often the better match.
The recipe
Use a coarse grind, roughly the texture of coarse sea salt. A ratio of 1:15 (about 30 g of coffee to 450 g of water) works well. Water temperature should be 200°F, the same as pour-over.
- Preheat the press. Pour hot water into the empty carafe, swirl, and discard.
- Add coffee. Place your coarse-ground coffee in the bottom of the carafe.
- Start the pour. Add all your water at once, making sure all the grounds are saturated. Start your timer.
- Stir gently. After 30 seconds, give the slurry a slow stir to break the crust that forms on top.
- Place the lid on. Do not press yet. Let the coffee steep for 4 minutes total.
- Press slowly. Apply steady, gentle pressure over about 20 to 30 seconds. Pressing too fast forces fine particles through the mesh and muddies the cup.
- Pour immediately. Do not let the coffee sit in the press after plunging. It will continue extracting and turn bitter.
Common mistakes to avoid with French press:
- Using too fine a grind (leads to over-extraction and a gritty cup)
- Letting the coffee sit after plunging (adds bitterness fast)
- Pressing too hard or too quickly (pushes sediment through the filter)
- Inconsistent grind (the most common culprit for uneven flavor)
Pro Tip: If you find sediment in your cup, try pouring through a fine mesh strainer. It keeps the body while reducing the grit.
Refining your technique for consistent results
Getting one great cup is satisfying. Getting a great cup every morning is the real goal. That requires consistency across your variables, and it starts with a scale.
A digital scale for dose and brew water is the second most important tool after your grinder. Scoops and eyeballing introduce variation that makes it impossible to know what changed when something tastes off. When you measure by weight, you can trust that your ratio is the same every time.
Beyond measurement, pay attention to these variables:
- Water quality. Chlorinated or mineral-heavy water mutes flavor. Filtered water lets the bean’s character come through.
- Bean freshness. Buy in smaller quantities more often. Store beans in an airtight container away from heat, light, and moisture. Avoid the refrigerator or freezer because condensation degrades the beans.
- Grinder maintenance. Clean your burr grinder every two to three weeks. Old coffee oils go rancid and taint fresh batches.
- Routine. Brew at the same time with the same water, the same dose, and the same technique. Consistency reveals what actually needs changing.
“The best cup is not the result of one perfect moment. It is the result of small, deliberate choices made the same way, every time.”
Pro Tip: Keep a simple brew log. Note the bean, grind setting, dose, brew time, and your flavor impression. After a few sessions, patterns emerge that no amount of reading can replace.
My honest take after years of home brewing
I’ve spent a lot of time at the intersection of good coffee and home brewing, and the thing I keep coming back to is this: most people upgrade their brewer when they should upgrade their grinder.
I’ve seen setups with beautiful, expensive pour-over equipment producing flat, muddy cups because the grinder was still a blade model. And I’ve seen a $40 hand burr grinder paired with a simple French press produce something genuinely extraordinary. The grind is where the flavor lives.
The other thing I’ve learned is that the ritual matters as much as the result. There is something about weighing your beans, blooming your grounds, and watching the water draw down that changes your relationship with the morning. It slows you down in a way that feels earned. That mindfulness is not incidental to great coffee. It is part of why it tastes better.
My advice: resist the urge to chase gadgets. Buy quality beans, invest in a burr grinder, and spend two weeks dialing in one method. You will learn more in those two weeks than you would from reading a hundred guides. The morning coffee ritual is something you build, not something you buy.
— Lily
Elevate your ritual with Maisoncantin
At Maisoncantin, we believe the quality of your beans determines the ceiling of your cup. Every bag is roasted fresh to order in small batches, so what arrives at your door is alive with aroma and flavor, not sitting on a warehouse shelf for months. Our specialty whole bean collections are crafted for exactly the kind of intentional brewing this guide describes, whether you prefer the clean brightness of a pour-over or the rich body of a French press.
If you are ready to explore specific flavor profiles, the Sapphire Collection offers single-origin and curated blends with distinct character. Each one is a starting point for your own refinement. Discover what your mornings can become at Maisoncantin.
FAQ
What is the best coffee-to-water ratio for pour-over?
Use 20 g of coffee to 320 g of water, which is a 1:16 ratio. This produces a balanced, clean cup and gives you a reliable baseline for adjusting to your personal taste.
How do I know if my grind size is correct?
Check your total brew time. A draw-down between 2:30 and 3:30 minutes signals proper extraction. Faster means grind finer; slower means grind coarser.
Can I make artisan coffee at home without expensive gear?
Yes. A hand burr grinder, a basic pour-over dripper, and a digital scale cost under $60 combined and produce results that far exceed any pod machine or blade grinder setup.
Why does my French press coffee taste bitter?
Bitterness usually means over-extraction. The most common causes are too fine a grind, steeping longer than 4 minutes, or leaving the coffee in the press after plunging. Fix one variable at a time.
How should I store specialty coffee beans at home?
Keep beans in an airtight container away from heat, light, and moisture. Buy in smaller quantities every one to two weeks rather than stocking large amounts. Avoid the refrigerator because temperature changes cause condensation that degrades the beans.
6 Comments